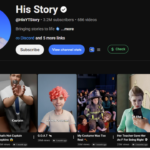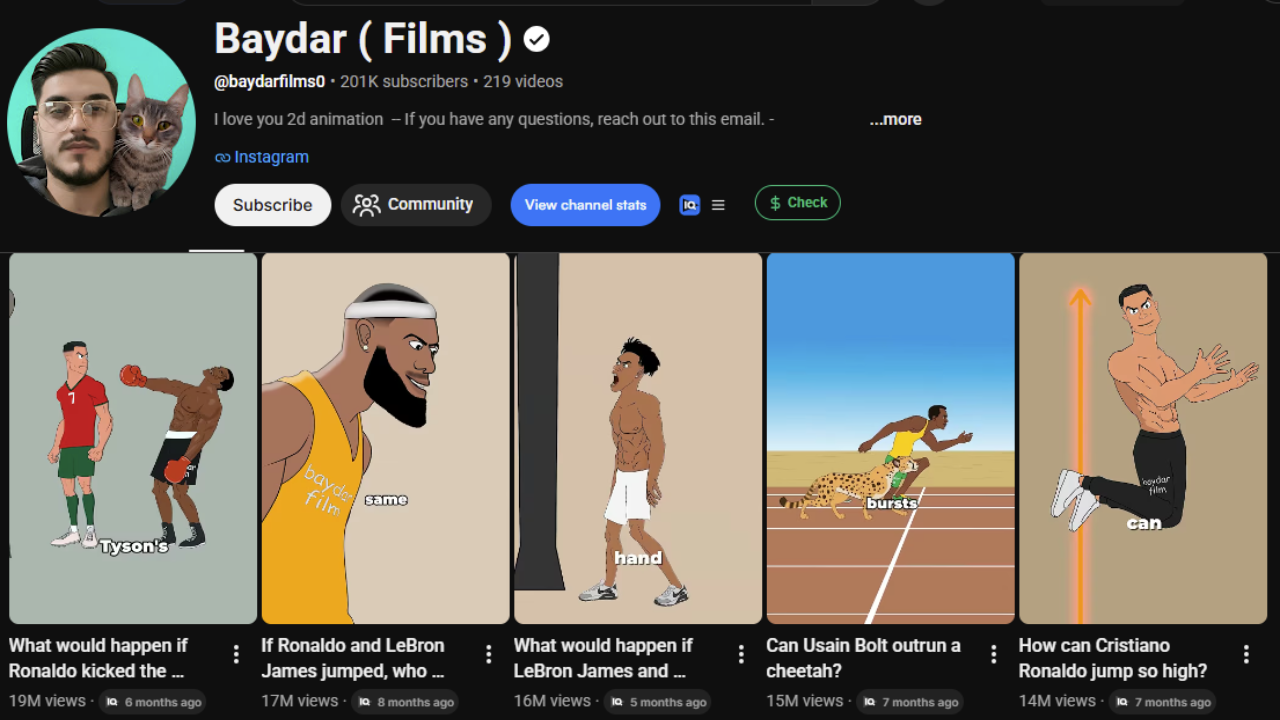
There’s a faceless channel called Baydar Films that’s quietly going crazy right now. One video — 19 million views. Another — 16 million. Then 15 million, 14 million… and it just keeps going, video after video, all in the millions. At the time of writing they’re sitting at around 200,000 subscribers off roughly 219 videos, and creators running this exact format are reportedly pulling in an estimated $40,000 a month.
Here’s the wild part: every single one of these is a simple 2D-animation-style short. Footballers, celebrities, “what if” matchups. That’s it.
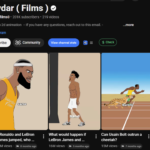
And it’s not a one-channel fluke. There’s at least one more channel doing the same thing — around 14,000 subscribers with a top video at 2.1 million views. This niche is blowing up right now thanks to the World Cup, but it’s evergreen: the videos keep racking up views long after the tournament ends.
Now the best bit: everything you’re about to see was made with 100% free AI. No paid tools, nothing. In this post I’ll walk you through the exact free workflow — the script, the visuals, the animation, all of it — so you can build your own version and start uploading in days, not months.
Stick around to the end, because the last step is the one that actually decides whether you hit 300 views or 3 million.
🔗 Step : Grab the free prompts (this is your whole foundation)
Before we touch any AI tool, you need the prompts. Nobody tells you this, but the visuals are the easy part — the prompts are what take forever to get right. I’ve already done that part for you.
I’ve put all of them into one Google Doc so you can copy them straight in. Inside you’ll find four prompts — that’s everything you need to build a full video, start to finish.
👉 Get the free prompts here:

One rule: do not edit the prompts. Don’t tweak a word. They’re written a specific way on purpose, and changing them is exactly where most people break their results. Just copy them clean.
The free tools we’ll use across the whole workflow:
- Claude – topic ideas, script, character sheets, and motion prompts
- GPT Image 2 (via Pippit AI) – consistent character sheets
- Flow AI – scene images and animation
- Mate AI – alternative animation tool
- ElevenLabs – the voiceover
- CapCut – final editing
All free to start. Let’s build.
Step 1: Generate 10 viral topic ideas
Open the prompt doc and copy Prompt #1 — the idea machine. It’s built purely for topic generation.
Now open Claude (the free AI we’re using here), paste the prompt straight in, and hit generate. In one shot, Claude hands you ten viral topic ideas, ready to go.
Don’t love any of them? Just generate again. One click and you get a brand-new batch — repeat as many times as you want until something jumps out and screams “that’s the video.”
Pick your winner and move on.
Step 2: Turn your idea into a full script
Back to the prompt doc and copy Prompt #2, top to bottom.
Paste it into Claude. There’s exactly one spot you touch: inside the prompt there’s a bracket that says “paste your chosen title here.” Drop your winning topic into that bracket. That’s the only edit.
Hit generate. Claude first tells you how long your video will run — character count, structure, the whole shape — so you know what you’re working with before you commit. Then it writes the full voiceover script, start to finish.
Keep this script handy. You’ll reuse it twice more.
Step 3: Build your visual blueprint (character sheets + image prompts)
Now we make it look like a video. Copy Prompt #3 from the doc and paste it into Claude.
This prompt asks for one thing: the script from Step 2. Paste the full script in underneath the prompt so Claude knows exactly what your video is about, then generate.
Claude does two things here:
- Figures out which characters appear in your video (the footballers, celebrities, whoever the story needs) and writes a character-sheet prompt for each one — this is what keeps your characters consistent in every scene. It’s the step most beginners skip, and it’s why their videos look messy and yours won’t.
- Lays out the image prompts for your scenes, ready to copy.
Your entire visual blueprint, done in one generate.
Step 4: Create your character sheets (GPT Image 2 via Pippit AI)
Now we bring those characters to life. We’re using GPT Image 2 because it makes the cleanest, most consistent character sheets of anything I tested — for free. That consistency is everything; it’s what keeps your characters from morphing into a different person each scene.
To use it free, open Pippit AI (add your referral link in the description / below), log in, and you’ll get free credits.
Then:
- Copy your first character-sheet prompt from Claude.
- In Pippit, click into the create box and choose GPT Image 2 in the model selector.
- Set the aspect ratio to 16:9.
- Paste the prompt and hit generate.
Repeat for each character. Then download every sheet in the no-watermark format — that clean version is what we feed into the next stage. Skip this and you’ll have a logo stamped across your whole video.
Step 5: Generate your scene images (Flow AI)
Head to Flow AI and click New Project. Hit Upload Media and upload both character sheets you just made.
This is the key move: by feeding Flow your character sheets first, every image it generates keeps your characters looking exactly the same. Without it, your Ronaldo looks like a different guy in every scene.
Now:
- Copy your first image prompt from Claude and paste it into Flow.
- Make sure your character-sheet boxes are loaded in.
- In settings, set the aspect ratio to 9:16 (vertical — we’re making Shorts).
- Pick the newest image model and hit generate.
Then run the same play again: keep the character sheets uploaded, copy the next image prompt, paste, generate. Copy → paste → generate → next. Keep going until every scene from your script has an image.
When they’re all done, download them one by one, in order, so nothing’s missing when you assemble everything.
Step 6: Animate your images into video
Time for one more set of prompts. Copy Prompt #4 (the last one in the doc) and paste it into Claude. Same drill: paste the full output from Step 3 underneath and generate.
Claude hands you back the exact same number of video prompts as you have images — one motion prompt per image. Every still now has a matching instruction telling the AI exactly how it should move.
You’ve got two free tools for the actual animation. Use whichever you prefer or whichever still has credits.
Option A — Flow AI
- New project → Settings → switch from image to video.
- Set your frame option, aspect ratio, and model.
- Click Start Frame → Upload Media and load your first image.
- Copy the matching video prompt from Claude, paste it in, hit generate.
Option B — Mate AI
- Click the + icon and upload your first image.
- Paste the matching video prompt from Claude.
- Hit generate.
Then rinse and repeat: next image, next prompt, generate. Leave your settings exactly as they are. Keep going until every image is a moving clip.
When they’re done, click the three dots above each clip and download them all, one by one, in order.
Step 7: Add the voiceover (ElevenLabs)
Your video is animated but silent. Let’s fix that.
Go back to Claude and copy your full script from Step 2. Then open ElevenLabs (add your link in the description / below) and sign up free.
On the main interface, click Text to Speech and paste your entire script into the box. On the right you’ll see a big list of voices — preview and generate any of them until you find the one that fits your channel’s vibe: deep and dramatic, calm and clean, whatever matches your style.
When you’ve got the one, download it.
Step 8: Edit it together in CapCut
Open CapCut (free), hit Import, and bring in everything — your voiceover and all your clips.
Order matters:
- Drop your voiceover on the timeline first — it’s the spine of the whole video.
- Layer your clips on top in order, matching each scene to what the voiceover is talking about.
- If a clip’s own audio fights the voiceover, select it, find the volume option, and turn it down.
- Nudge each clip so it lines up cleanly with the narration — this syncing is what makes it feel professional instead of thrown together.
- Add transitions between clips. For this content, punchy, sporty transitions work great. Add a few effects if you want extra polish.
When it looks right, hit Export. CapCut renders it straight to your device.
That’s a complete, finished video. But we’re not done — because a great video with a bad upload still flops.
Step 9: The upload (the step that decides 300 views vs. 3 million)
This is the part most people rush, and it’s the difference between a flop and a breakout. A few things that consistently matter for this niche:
- Title: Lead with the matchup or the “what if.” Curiosity-driven, specific, and short enough to read at a glance (e.g. “What If Ronaldo Played for…”). The title is the first thing that earns the click.
- Hook the first 1–2 seconds: Open on your strongest visual or a bold on-screen text question. Retention in the opening seconds is what tells the algorithm to push your Short.
- Thumbnail (for the long-form / YouTube page): Big faces, high contrast, one clear idea. Don’t crowd it.
- Description + hashtags: A short description with relevant tags (player names, club names, #shorts, #football) helps surfacing and search.
- Post consistently: This format rewards volume. The channels winning at it upload often — every new video is another shot at the algorithm.
Tweak, watch your retention graph, and double down on the topics that pop.
You’re ready to start uploading
That’s the whole free workflow — idea, script, characters, images, animation, voiceover, edit, and upload — built entirely with free AI tools. Run it once and the second video takes a fraction of the time.
The only thing standing between you and your first upload is the prompts. Grab them here and get started today:
If this helped, share it with someone who’s been wanting to start a faceless channel — and let me know in the comments which matchup you’re making first.